
In this article, we are going to shows how to Install Gitea on Ubuntu 20.04 | 18.04 . If you are interested to Install Gitea on your Ubuntu system then this post is ideal for you.
Gitea is an open source, fast, lightweight, easy-to-use and self-hosted git platform similar to GitHub, Bitbucket, and Gitlab. It is written in Go and published under the MIT license. It comes with many rich features like issues and time tracking, file locking and tagging, repository branching, merging, user management, notifications, built-in wiki and many other features.
For more details about Gitea, please check its official website.
How to Install Gitea on Ubuntu
Simply follow below steps to install Gitea on your Ubuntu machine :
Step 1 : Update the package list
Before installing Gitea, Update the all installed packages on your system. To do that, run the command below:
sudo apt update
sudo apt upgrade
Step 2 : Install Git and Create Git User
Run the command below to install git package on your Ubuntu system:
sudo apt install gitTo verify the git installation, run the command below:
git --versionOutput
git version 2.25.1After installing Git, you will need to create a Git user to run Gitea services and application. To create a Git user, run the commands below:
sudo adduser --system --group --disabled-password --shell /bin/bash --home /home/git --gecos 'Git Version Control' gitThe command above will display a output similar like below:
Output
Adding system user `git' (UID 112) ...
Adding new group `git' (GID 119) ...
Adding new user `git' (UID 112) with group `git' ...
Creating home directory `/home/git' ...
Step 3 : Install and Configure MariaDB Server
You will also need a database server to run Gitea and store its content. MariaDB database server is an open source, fast and secure database server that you can use with Gitea.
To install MariaDB database server, simply run the commands below:
sudo apt update
sudo apt-get install mariadb-server mariadb-client
Next, you can use the commands below to stop, start and enable MariaDB service to always start up with the server boots:
sudo systemctl stop mariadb.service
sudo systemctl start mariadb.service
sudo systemctl enable mariadb.service
Now, run the commands below to secure MariaDB server by creating a root password and disallowing remote root access.
sudo mysql_secure_installationWhen you run the above command, it will prompted to answer the questions as show below:
- Enter current password for root (enter for none): Just press the Enter
- Set root password? [Y/n]: Y
- New password: Enter password
- Re-enter new password: Repeat password
- Remove anonymous users? [Y/n]: Y
- Disallow root login remotely? [Y/n]: Y
- Remove test database and access to it? [Y/n]: Y
- Reload privilege tables now? [Y/n]: Y
For check if MariaDB is installed and working, run the command below:
sudo mysql -u root -pWhen prompted, type the root password.
If you see the similar lines as below, then the MariaDB server was successfully installed.
Welcome to the MariaDB monitor.  Commands end with ; or \g.
Your MariaDB connection id is 46
Server version: 10.3.29-MariaDB-0ubuntu0.20.04.1 Ubuntu 20.04
Copyright (c) 2000, 2018, Oracle, MariaDB Corporation Ab and others.
Type 'help;' or '\h' for help. Type '\c' to clear the current input statement.
MariaDB [(none)]>
Next, create a blank Gitea database and database user. To do that, run the command below to logon to MariaDB database server:
sudo mysql -u root -pOnce connected, change the GLOBAL innodeb_file_per_table to On as show below:
SET GLOBAL innodb_file_per_table = ON;Next, create a database named giteadb using command below:
CREATE DATABASE giteadb;Now, run the command below to create a database user named giteauser :
CREATE USER 'giteauser'@'localhost' IDENTIFIED BY 'your_new_password';Grant the newly created database user to the database by using command below:
GRANT ALL ON giteadb.* TO 'giteauser'@'localhost' IDENTIFIED BY 'your_new_password' WITH GRANT OPTION;Next, run the commands below to update the database character set to utf8mb4
ALTER DATABASE giteadb CHARACTER SET = utf8mb4 COLLATE utf8mb4_unicode_ci;Finally, save your changes and exit:
FLUSH PRIVILEGES;
EXIT;
After that, open MariaDB default configuration file by running the commands below:
sudo nano /etc/mysql/mariadb.conf.d/50-server.cnfThen add the lines below inside [mysqld] section:
innodb_file_format = Barracuda
innodb_large_prefix = 1
innodb_default_row_format = dynamic
Save the configuration file and restart the MariaDB service:
sudo systemctl restart mariadbStep 4 : Install Gitea Packages
To download the latest version of Gitea from the its official website, run the command below:
cd /tmp
wget https://dl.gitea.io/gitea/1.14.2/gitea-1.14.2-linux-amd64
At this time, the latest and stable version of Gitea is 1.14.2. To check the new and stable version of Gitea, visit its Download page.
Next, move downloaded files into the /usr/local/bin directory and make it executable by running command below:
sudo mv gitea-1.14.2-linux-amd64 /usr/local/bin/gitea
sudo chmod +x /usr/local/bin/gitea
After that, run the commands below to create some directories or folders for Gitea to use and change the permissions:
sudo mkdir -p /var/lib/gitea/{custom,data,indexers,public,log}
sudo chown git:git /var/lib/gitea/{data,indexers,log}
sudo chmod 750 /var/lib/gitea/{data,indexers,log}
sudo mkdir /etc/gitea
sudo chown root:git /etc/gitea
sudo chmod 770 /etc/gitea
Step 5 : Create a Systemd Unit File
Next, create a systemd unit file to run Gitea as a systemd service. To do that, download the sample systemd unit file inside the /etc/systemd/system directory by running the command below:
sudo wget https://raw.githubusercontent.com/go-gitea/gitea/main/contrib/systemd/gitea.service -P /etc/systemd/system/The sample systemd unit file is already configured so no need to edit it.
Next, reload systemd and start Gitea service:
sudo systemctl daemon-reload
sudo systemctl enable gitea
sudo systemctl start gitea
You can check Gitea status by running the commands below:
sudo systemctl status giteaStep 6 : Configure Gitea
Open your favorite web browser and browse for the server domain name or IP address followed by port 3000.
http://YOUR_DOMAIN_OR_IP:3000Note :- If your server is secured with UFW firewall then you will need to open the Gitea port to allow traffic on port 3000. To do that, run the command below:
sudo ufw allow 3000/tcpSkip above step if UFW firewall is not enable.
So browse to the server hostname or IP address followed by port 3000 as show below:
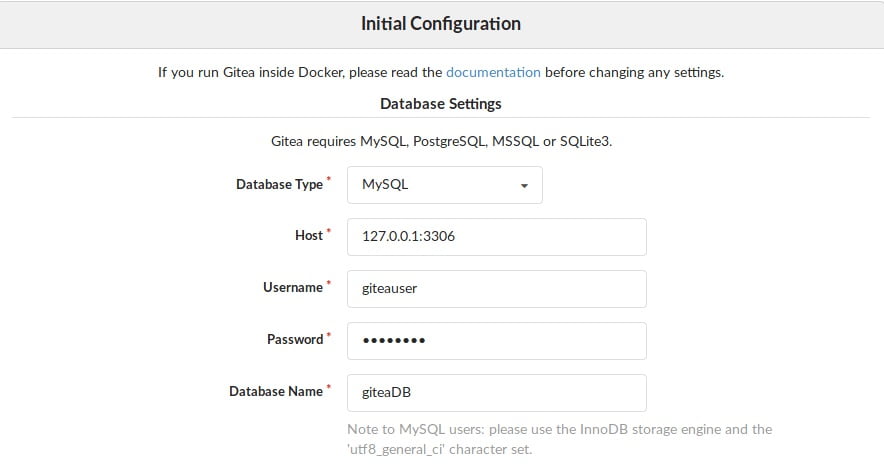
It will open the Initial configuration setup screen. At this screen type the database details:
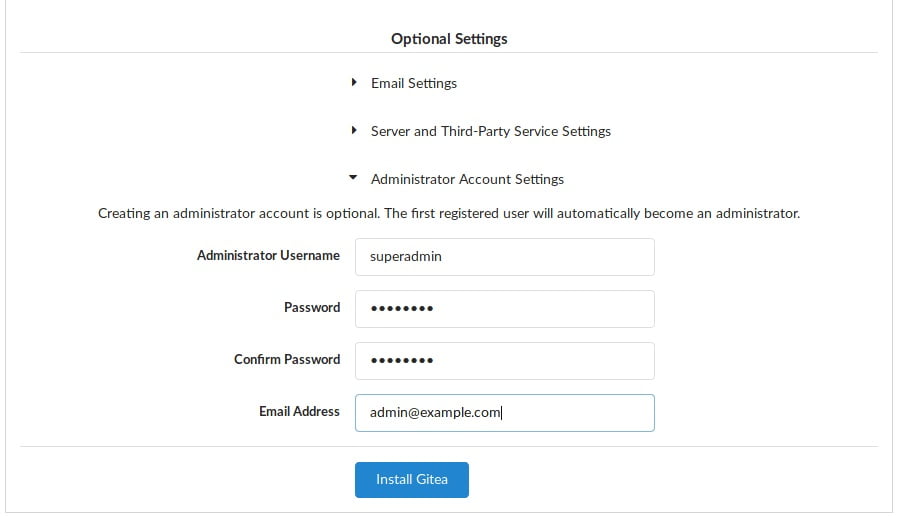
Also, setup the backend admin account and click on Install Gitea button to continue:
Login with admin account created above and enjoy.
That’s all
If you face any error and issue in above steps , please use comment box below to report.
If our tutorials helped you, please consider buying us a coffee. We appreciate your support!
Thank you for your support.

