In this article, we are going to shows that how to Install ONLYOFFICE Workspace on Ubuntu 18.04 | 20.04.
ONLYOFFICE is a free software office suite that is developed by Ascensio System SIA. It has many features like online document editors, document management platform, corporate and business communication, mail and project management tools.
ONLYOFFICE Workspace includes :-
- ONLYOFFICE Doc – a productivity suite of documents, spreadsheets, and presentations.
- ONLYOFFICE Group – a document and project management, mail, CRM, calendar, communication hub.
- ONLYOFFICE Mail – a solution to create and manage corporate mailboxes and many more.
Ubuntu is a Linux Operating System based on Debian and mostly composed of non-profit(free) and open-source software. It is a complete Linux operating system that compatible with desktops, laptops, server and other devices. Ubuntu is Open Source so it is freely available for both community and professional support.
If you are a learner and looking for a Linux distribution for Learning then Ubuntu Linux Operating System is best for you as a beginning.
How to Install ONLYOFFICE Workspace on Ubuntu 18.04 | 20.04
Simply follow below steps to install ONLYOFFICE Workspace on your Ubuntu system:
Step 1 : Download ONLYOFFICE script file
Before installing ONLYOFFICE Workspace, you need to download its install script file from the official website.
Simply run the below commands to download its install script file:
cd /tmp
wget https://download.onlyoffice.com/install/workspace-install.sh
Step 2 : Install ONLYOFFICE Workspace
Now the install script is downloaded, so run the below commands to install ONLYOFFICE:
sudo bash workspace-install.sh -md "example.com"
In the above command, replace example.com with your domain that will be used for ONLYOFFICE Mail.
In case, if you don’t want to install Mail Server with ONLYOFFICE Workstation, then run the bellow command:
sudo bash workspace-install.sh -ims false
During the installation process, you’ll be prompted to choose:
Install with Docker [Y/N/]?
Choose ‘Y’ to install ONLYOFFICE using Docker and choose ‘N’ to install it using DEB package.
After complete installation process, you will get a message similar as below:
Thank you for installing ONLYOFFICE.
You can now configure your portal using the Control Panel
In case you have any questions contact us via http://support.onlyoffice.com or visit our forum at http://dev.onlyoffice.org
Step 3 : Access ONLYOFFICE Workspace
To access ONLYOFFICE Workspace , open your favorite web browser and browse for your server hostname or IP address.
After open ONLYOFFICE Workspace, Create an account and continue.
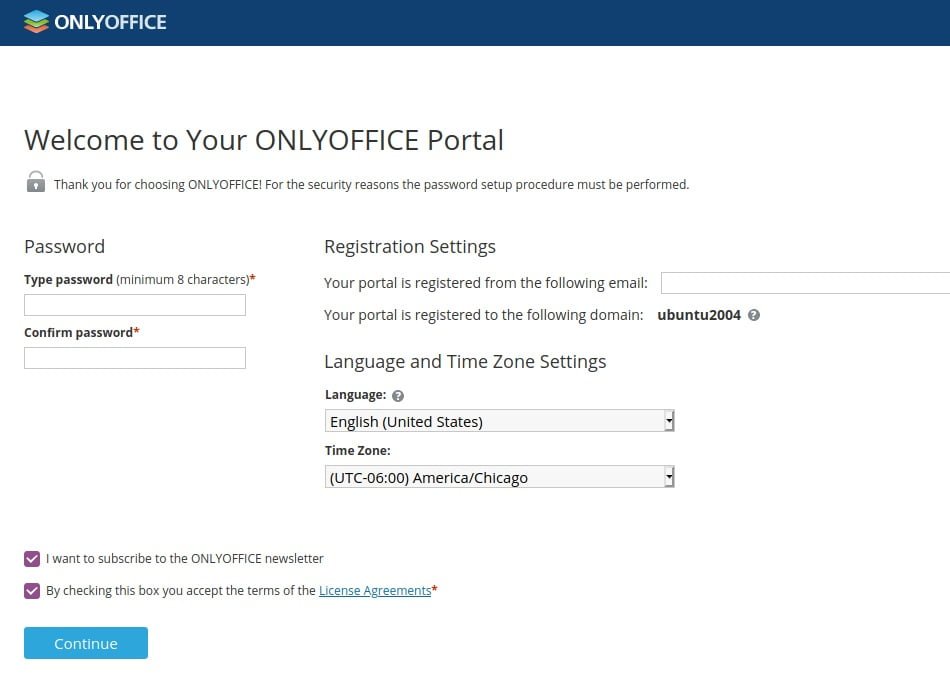
After create an account you can begin setting up your environment and configuring your settings.
That’s all
If you face any error and issue in above steps , please use comment box below to report.

