In this article, we are going to shows how to install Windows Subsystem for Linux (WSL) on your Windows 11 system. If you wan to use linux on your Windows system then this article is useful and ideal for you.
Microsoft Windows has officially released the first build of Windows 11 for developers and enthusiasts to get their feedback on the new features and UI design changes. If your system meets the all requirements to get Windows 11 Insider Preview then you can join the Windows Insider program.
Windows 11 is a major release of the Windows NT operating system developed by Microsoft. it is the successor to Windows 10 and it’s expected to be released later this year.
The Windows Subsystem for Linux (WSL) allows you to run a GNU/Linux environment including most command-line tools, utilities, and applications directly on Windows system.
WSL2 is an improvement version of WSL. It comes with features such as file system performance boost, full system call compatibility, Managed VM, built with a new architecture, full Linux Kernel and many more.
With the help of WSL, you can easily install full Linux operating system in your Windows 10 system. You just need to enable WSL (Windows Subsystem for Linux) in your Windows 11 system.
How to Install WSL on Windows 11
Simply follow below steps to install WSL on your Windows 11 system:
Step 1 : Install and Enable WSL
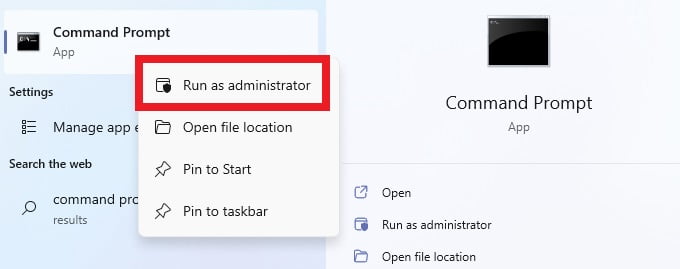
First of all, you will need to enable WSL in your Windows system. To enable it, simply open Command Prompt terminal as administrator.
Click on Start icon -> search for Command Prompt -> right-click on the Command Prompt app -> choose to run as administrator as shown in image below:
Next, run the command below in the Windows console to install WSL :
wsl --install
It will take some time to be installed.
After installing, the command above will display a successful message similar as below:
Installing: Virtual Machine Platform
Virtual Machine Platform has been installed.
Installing: Windows Subsystem for Linux
Windows Subsystem for Linux has been installed.
Downloading: WSL Kernel
Installing: WSL Kernel
WSL Kernel has been installed.
Downloading: GUI App Support
Installing: GUI App Support
GUI App Support has been installed.
Downloading: Ubuntu
The requested operation is successful. Changes will not be effective until the system is rebooted.
Now, restart your computer.
After restart, WSL is ready to use. When you want to update WSL, run the commands below:
wsl --update
Step 2 : Install a Specific Linux distribution
At this point, WSL is installed and ready to be used. You can now install any available Linux distro according your choice.
Run the command below to get the list of available Linux distributions to install:
wsl --list --online
The command above will display a list of all available Linux distributions that can be installed on WSL:
NAME            FRIENDLY NAME
Ubuntu          Ubuntu
Debian          Debian GNU/Linux
kali-linux      Kali Linux Rolling
openSUSE-42     openSUSE Leap 42
SLES-12         SUSE Linux Enterprise Server v12
Ubuntu-16.04    Ubuntu 16.04 LTS
Ubuntu-18.04    Ubuntu 18.04 LTS
Ubuntu-20.04    Ubuntu 20.04 LTS
Now, choose a Linux distribution from the list above and run the command below along with distribution name. For example, if you want install Ubuntu 20.04 on your system then run the commands below:
wsl --install -d ubuntu-20.04
The command above will display a message similar like below:
Downloading: Ubuntu 20.04 LTS
Installing: Ubuntu 20.04 LTS
Ubuntu 20.04 LTS has been installed.
Launching Ubuntu 20.04 LTS...
After installing, it will launch automatically and you will get a command console to create and setup a default user account:
Installing, this may take a few minutes...
Please create a default UNIX user account. The username does not need to match your Windows username.
For more information visit: https://aka.ms/wslusers
Enter new UNIX username: studiesonline
New password:
Retype new password:
passwd: password updated successfully
Installation successful!
To run a command as administrator (user "root"), use "sudo <command>".
See "man sudo_root" for details.

Welcome to Ubuntu 20.04 LTS (GNU/Linux 4.4.0-22000-Microsoft x86_64)
Use some troubleshooting commands when you get issues above. Run the below troubleshooting commands and launch Ubuntu again:
wsl --set-default-version 1
bcdedit /set hypervisorlaunchtype auto start
That’s all.
If you face any error and issue in above steps , please use comment box below to report.
If our tutorials helped you, please consider buying us a coffee. We appreciate your support!
Thank you for your support.

