This post shows users and new students How to Install PHP 8.0 on Ubuntu 18.04 | 20.04.
PHP 8.0 is a new version with lots of improvements and features. It will officially set to be released on November 26, 2020.
For WordPress sites, latest version of PHP offers new features and improvements for developers. They will find useful and improvements that enhance security and performance of the PhP based application or website in the long run.
PHP is a popular general purpose scripting programmiing language especially for the web development. It was originally developed by Danish Canadian programmer Rasmus Lerdorf in 1994.
For the new students and new users, this post will be useful and handy if they want to learn that how to install PHP 8.0 on Ubuntu with Apache or Nginx web server.
Add PPA Repository to install PHP 8.0
Some versions of Ubuntu do not have latest version of PHP including also PHP 8.0 so you can add a third party PPA repository for installing the latest version from there.
Use below command to add a third party PPA repository to Ubuntu.
sudo apt update
sudo apt-get install software-properties-common
sudo add-apt-repository ppa:ondrej/php
After above steps we need to update and upgrade to latest version of PHP of your choice.
sudo apt update
After complete installing the PPA repository, now you can install PHP 8.0.
Install PHP 8.0 with Apache server
Run the below commands to use PHP with Apache server.
sudo apt update
sudo apt install php8.0 libapache2-mod-php8.0
After the run above commands it will install the latest version of PHP with Apache on Ubuntu.
After installing latest version of PHP, you need to restart Apache server using the below commands:
sudo systemctl restart apache2
Run the below commands to review and check PHP version:
php -v
When you run above command It should show similar lines like below:
HP 8.0.0RC3 (cli) (built: Oct 31 2020 17:06:41) ( NTS )
Copyright (c) The PHP Group
Zend Engine v4.0.0-dev, Copyright (c) Zend Technologies
with Zend OPcache v8.0.0RC3, Copyright (c), by Zend Technologies
Install PHP 8.0 with Nginx server
Run the below commands to install Nginx with PHP:
sudo apt update
sudo apt install nginx php8.0-fpm
The above commands is install the latest version of PHP-FPM with Nginx server on Ubuntu.
After above step restart Nginx and PHP-FPM.
sudo systemctl restart nginx
sudo systemctl restart php8.0-fpm
Run the commands below to validate PHP status:
sudo systemctl status php8.0-fpm
You get something similar to the below lines:
php8.0-fpm.service - The PHP 8.0 FastCGI Process Manager
Loaded: loaded (/lib/systemd/system/php8.0-fpm.service; enabled; vendor pr>
Active: active (running) since Tue 2020-11-25 10:27:00 CST; 13s ago
Docs: man:php-fpm8.0(8)
Process: 11761 ExecStartPost=/usr/lib/php/php-fpm-socket-helper install /ru>
Main PID: 11740 (php-fpm8.0)
Status: "Processes active: 0, idle: 2, Requests: 0, slow: 0, Traffic: 0req>
Tasks: 3 (limit: 4657)
Memory: 7.0M
CGroup: /system.slice/php8.0-fpm.service
├─11740 php-fpm: master process (/etc/php/8.0/fpm/php-fpm.conf)
├─11756 php-fpm: pool www
└─11757 php-fpm: pool www
Nov 24 09:27:00 ubuntu2004 systemd[1]: Starting The PHP 8.0 FastCGI Process Man>
You will need to manually edit the site server block to enable PHP support because Nginx server does not have built-in support for PHP.
Run the below commands to open the default server block on Ubuntu :
sudo nano /etc/nginx/sites-available/default
Then edit the below lines to enable PHP support.
# Add index.php to the list if you are using PHP
        index index.php index.html index.htm index.nginx-debian.html;


        # pass PHP scripts to FastCGI server
        #
        location ~ \.php$ {
                include snippets/fastcgi-php.conf;
        #
        #       # With php-fpm (or other unix sockets):
                fastcgi_pass unix:/var/run/php/php8.0-fpm.sock;
        #       # With php-cgi (or other tcp sockets):
        #       fastcgi_pass 127.0.0.1:9000;
        }

        # deny access to .htaccess files, if Apache's document root
        # concurs with nginx's one
After edit save the file and exit.
Then reload Nginx and PHP.
sudo systemctl reload nginx
sudo systemctl reload php8.0-fpm
Testing PHP Processing
Run the below Commands for testing the processing of PHP
First of all, create a test PHP file called info.php in the server’s default home directory.
sudo nano /var/www/html/info.php
Then copy and paste the below line into the created file and save it.
<?php
phpinfo();
Save the file and exit.
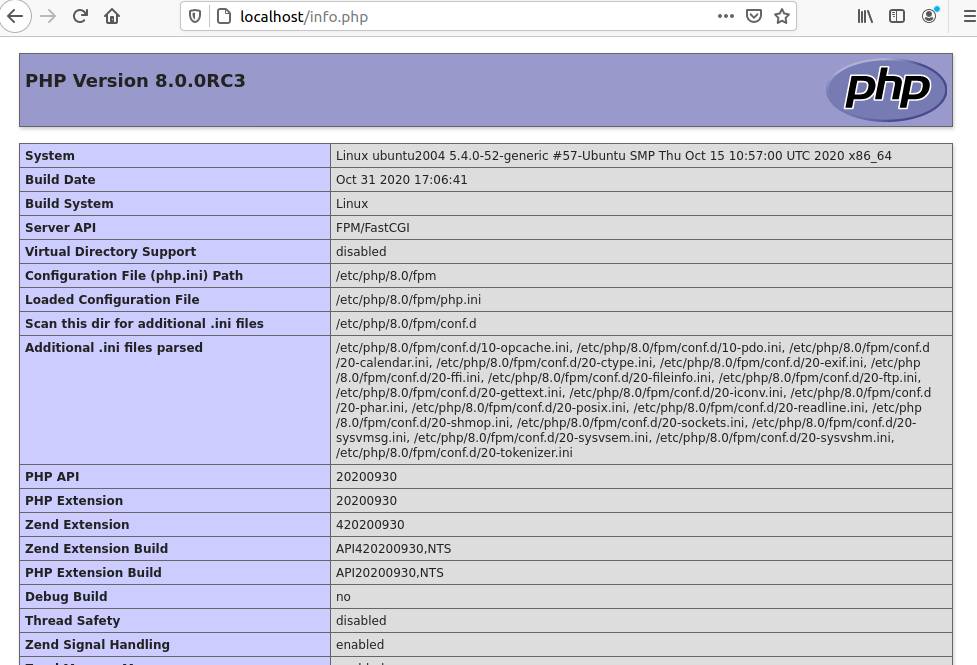
Now open your browser and browse to the server hostname using the name of the file you created.
https://linuxprohints.com/
The result display a PHP configuration settings like below:
That’s all!
If you find any error and issue in above steps , please use comment box below to report.

