This post shows users and new students that how to Add a Printer in Window 10 operating system. If you want to Add a Printer in Window 10 then this post is ideal for you.
If you want to print your documents then you need to add a printer with your system. When you are connect a printer to your computer or add a new printer to your home group network then you can usually start printing documents in right away.
If you add a new printer to your computer or device and it is does not work automatically then follow the simple steps below to get it installed properly in your computer.
Windows 10 is most recent and powerful version of operating systems(OS) for personal computers. It is developed and released by Microsoft. If you are New student and User and you are looking a personal computer to start learning then Windows 10 computers best choice for you.
Windows 10 is one of the best operating systems and it is used by millions of users around the worldwide.
Please Follow the below steps to Add a printer in Windows 10 :
Install or Add a local Printer
Installing or Adding a printer to Windows 10 computer is very easy process. In most of cases, all you have to do for set up a printer is to connect it to your computer or device.
For install printer, plug in the USB cable from your printer into USB port on your computer, and then turn on the printer. Windows will automatically install the required printer drivers and configure it to work.
If automatic install and configuration does not work then you need to do it manually.
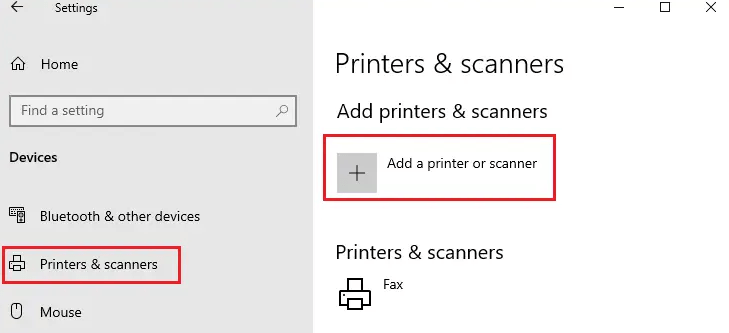
- Select Start > Settings > Devices > Printers & scanners.
- Select Add a printer or scanner option. Wait for it to find available scanners, after find available printer choose the printer you want to use from the list and select Add device.

Add a Network or Wireless Printer
If your printer is connected to the network via Wi-Fi or using wired network and it turned on, then Windows also find it automatically.
And if Windows does not find it automatically then we need to do it manually.
- Select Start > Settings > Devices > Printers & scanners.
- Select Add a printer or scanner option. Wait for it to find available printers, after find available printers, choose the printer that you want to use from the list and select Add device.
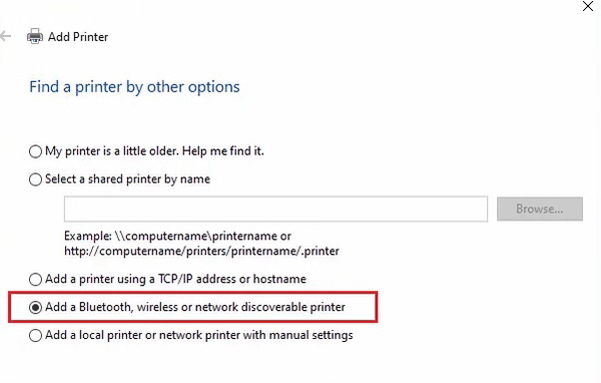
After above steps if your printer is not in the list then select option The printer that I want isn’t listed,then follow instructions for add it manually.

You will be able to find available wireless or network printer when you are follow the above guide picture.
That’s all
If you find any error and issue in above steps , please use comment box below to report.


